DevTools/CodingStandards
The DevTools JS code base is quite large, and a lot of different people contribute to it all the time, so it's important that a set of standards be shared when coding so that the code is consistent, written in a predictable style that also hopefully helps avoid common mistakes.
Contents
- 1 JS linting with ESLint
- 1.1 Installing ESLint and Recommended plugins
- 1.2 Running ESLint from the command line
- 1.3 Running ESLint in CI
- 1.4 Running ESLint in SublimeText
- 1.5 Running ESLint in Emacs
- 1.6 Running ESLint in Atom
- 1.7 Running ESLint in ViM
- 1.8 Running ESLint in Visual Studio Code
- 1.9 Getting Rid of ESLint Errors
- 2 Code style
- 3 Comments
- 4 Asynchronous Code
- 5 React & Redux
JS linting with ESLint
In order to help people write standard-compliant code from the start and avoid wasting time during code reviews, a set of ESLint configuration files have been added to the DevTools code base so that JavaScript can be analyzed automatically.
This automatic linting can happen either while coding, in a code editor, or when using the command line.
- Learn more about ESLint,
- learn how to integrate ESLint in your code editor,
- or run it on the command line. Note that ESLint has been integrated to our build system and has some Mozilla specific plugins so it should always be run from the command line using
./mach eslint.
Our ESLint rule set is meant to be used with ESLint 3.5.0.
The main rule set is defined in ./devtools/.eslintrc.
Installing ESLint and Recommended plugins
From the root of the project type:
./mach eslint --setup
ESLint, eslint-plugin-html, eslint-plugin-mozilla and eslint-plugin-react will be automatically downloaded and installed.
Running ESLint from the command line
The preferred way of running ESLint from the command line is by using mach like this:
./mach eslint path/to/directory
This makes sure that ESLint runs with the same configuration that on our CI environment (see the next section).
Note that the file .eslintignore at the root of the repository contains a list of paths to ignore. This is because a lot of the code isn't ESLint compliant yet. We're in the process of making code free of ESLint warnings and errors, but this takes time. In the meantime, make sure the file or folder you are running ESLint on isn't ignored.
Running ESLint in CI
Relying only on people to run ESLint isn't enough to guarantee new warnings or errors aren't introduced in the code. Therefore, ESLint also runs automatically in our Continuous Integration environment. This means that every time a commit is pushed to one of the repositories, a job runs ESLint on the whole code.
If you are pushing a patch to the try repository to run the tests, then you can also tell it to run the ESLint job and therefore verify that you did not introduce new errors.
If you build on all platforms, then the ESLint job will run by default, but if you selected a few platforms only in your trysyntax, then you need to also add eslint-gecko as a target platform for ESLint to run.
Running ESLint in SublimeText
SublimeText is a popular code editor and it supports ESLint via a couple of plugins. Here are some pointers to get started:
- make sure you have SublimeText 3, the linter plugin doesn't work with ST2,
- install SublimeLinter 3, this is a framework for linters that supports, among others, ESLint, (installing SublimeLinter via Package Control is the easiest way),
- with SublimeLinter installed, you can now install the specific ESLint plugin (the installation instruction provide details about how to install node, npm, eslint which are required).
- make sure to configure SublimeLinter with the
--no-ignoreoption so that errors are also shown for source files that are ignored. To do this, open the SublimeLinter user configuration at: Preferences / Package Settings / SublimeLinter / Settings - User, and add"args": "--no-ignore"to the eslint linter object.
You will also need to point SublimeLinter at the local eslint installation by setting the path to whatever ./mach eslint --setup gives you when you run it (include a trailing slash but remove the eslint binary filename) e.g.
   NOTE: Your local eslint binary is at
         /some-project-path/node_modules/.bin/eslint
   "paths": {
       "linux": [],
       "osx": [
           "/some-project-path/node_modules/.bin"
       ],
       "windows": [
           "C:\\some-project-path\\node_modules\\.bin"
       ]
   },
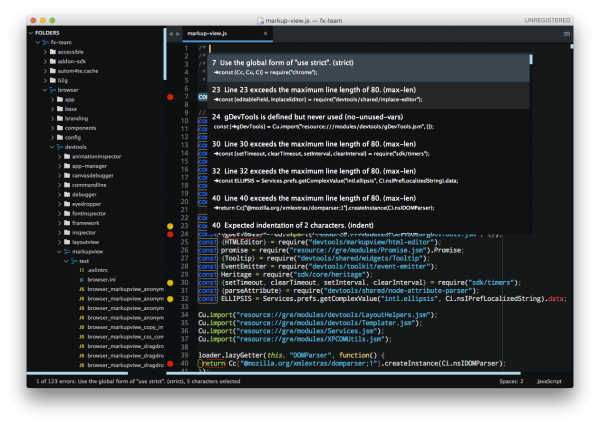
Once done, open the mozilla project in SublimeText and open any JS file in the /devtools directory. You can then trigger the linter via the contextual menu (right click on the file itself) or with a keyboard shortcut (ctrl+option+L on Mac).
You should see errors and warnings in the gutter as shown in the screenshot below. You can also see all errors listed with ctrl+option+A, and individual errors by clicking in the gutter marker.
Running ESLint in Emacs
- First, install the flycheck package (flymake doesn't support ESLint yet). You can get flycheck from the marmalade or melpa-stable repositories.
- Tell flycheck to disable jslint, and enable flycheck in your javascript mode. Some care is needed to find the eslint installed in the source tree. This snippet assumes the built-in javascript mode, but with minor changes (just the name of the hook) should work fine with js2-mode as well:
(defun my-js-mode-hacks ()
  (setq-local mode-name "JS")
  ;; Set this locally so that the head.js rule continues to work
  ;; properly.  In particular for a mochitest we want to preserve the
  ;; "browser_" prefix.
  (when (buffer-file-name)
    (let ((base (file-name-nondirectory (buffer-file-name))))
      (when (string-match "^\\([a-z]+_\\)" base)
	(setq-local flycheck-temp-prefix (match-string 1 base))))
    (let ((base-dir (locate-dominating-file (buffer-file-name)
					    ".eslintignore")))
      (when base-dir
	(let ((eslint (expand-file-name
		       "tools/lint/eslint/node_modules/.bin/eslint" base-dir)))
	  (when (file-exists-p eslint)
	    (setq-local flycheck-javascript-eslint-executable eslint))))))
  (flycheck-mode 1))
(require 'flycheck)
(setq-default flycheck-disabled-checkers
	      (append flycheck-disabled-checkers
		      '(javascript-jshint)))
(add-hook 'js-mode-hook #'my-js-mode-hacks)
- flycheck puts its bindings on
C-c !by default, so useC-c ! C-hto see what is available. There are key bindings to list all the errors and to move through the errors, among other things. - To make sure flycheck is finding eslint, open a .js file and run M-x flycheck-verify-setup. It should show the path to your eslint installation.
Running ESLint in Atom
From the root of the project type:
./mach eslint --setup
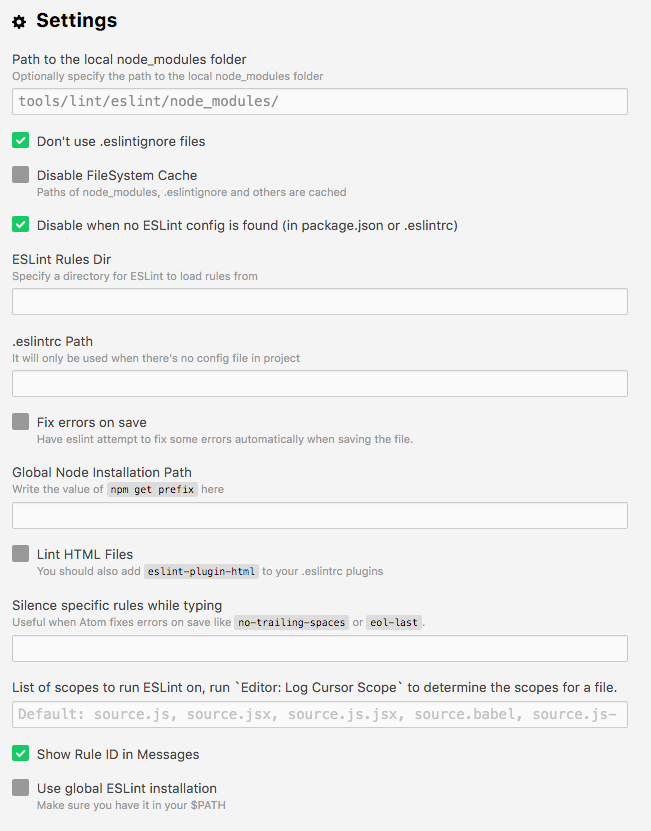
Install the linter-eslint package v.8.00 or above. Then go to the package settings and enable the following options:
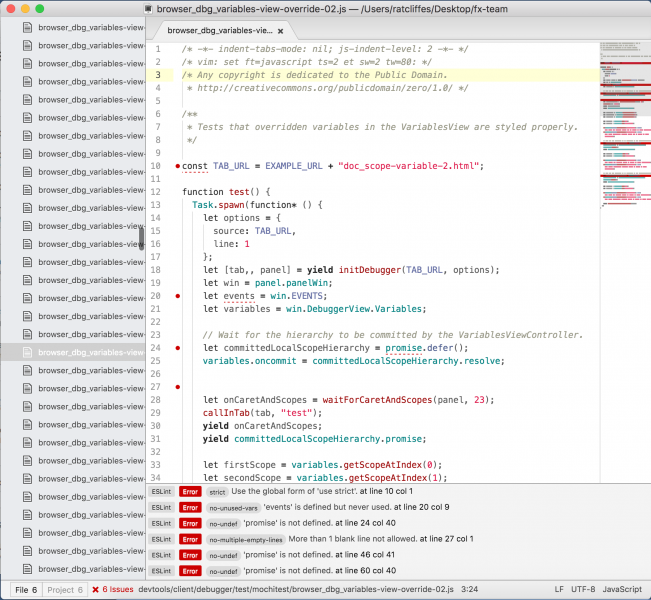
Once done, you should see errors and warnings as shown in the screenshot below.
Running ESLint in ViM
If you don't use Syntastic yet, the instructions here should get you started: https://wiki.mozilla.org/WebExtensions/Hacking#Vim
Alternatively, if you do use Syntastic already, add this to your .vimrc to get ESLint working where the path contains mozilla-central (adjust the path to reflect the one in your computer):
autocmd FileType javascript,html
   \ if stridx(expand("%:p"), "/mozilla-central/") != -1 |
   \    let b:syntastic_checkers = ['eslint'] |
   \    let b:syntastic_eslint_exec = '/path/to/mozilla-central/tools/lint/eslint/node_modules/.bin/eslint' |
   \    let b:syntastic_html_eslint_args = ['--plugin', 'html'] |
   \ endif
You probably need to close and reopen ViM for the changes to take effect. Then, open any file and try to edit it to cause an error, then save it. If all goes well, you will get some distinctive arrows pointing to the error. Hovering with the mouse will produce a sort of tooltip with more information about the error.
Running ESLint in Visual Studio Code
From the root of the project type:
./mach eslint --setup
Install the dbaeumer.vscode-eslint package. Then go to the package settings and set the following option:
"eslint.nodePath": "tools/lint/eslint/node_modules/.bin"
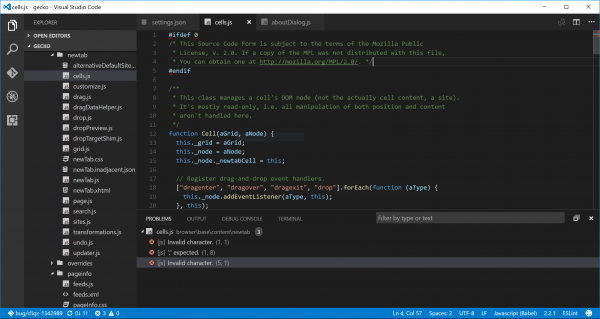
Once done, you should see errors and warnings as shown in the screenshot below.
Getting Rid of ESLint Errors
Here is list of advice for people writing new code that, hopefully, help with writing eslint-clean code:
- When moving or refactoring a piece of code, consider this as an opportunity to remove all ESlint errors from this piece of code. In fact, it may even be a good opportunity to remove all ESLint errors from the entire file.
- When doing ESLint-only changes, please do them in a separate patch from the actual functionality changes or bug fix. This helps make the review easier, and isolate the actual changes when looking at the source history.
- When cleaning an entire file or folder from ESLint errors, do not forget to remove the corresponding entry from the
.eslintignorefile. - When writing new code, from scratch, please make it ESLint compliant from the start. This is a lot easier than having to revisit it later.
- ESLint also runs on
<script>tags in HTML files, so if you create new HTML test files for mochitests for example, make sure that JavaScript code in those files is free of ESLint errors. - Depending on how a dependency is loaded into a file, the symbols this dependency exports might not be considered as defined by ESLint. For instance, using
Cu.import("some.jsm")doesn't explicitly say which symbols are now available in the scope of the file, and so using those symbols will be consider by ESLint as using undefined variables. When this happens, please avoid using the/* globals ... */ESLint comment (which tells it that these variables are defined). Instead, please use/* import-globals-from relative/path/to/file.js */. This way, you won't have a list of variables to maintain manually, the globals are going to be imported dynamically instead. - In test files (xpcshell and mochitest), all globals from the corresponding
head.jsfile are imported automatically, so you don't need to define them using a/* globals ... */comment or a/* import-globals-from head.js */comment.
Code style
Probably the best piece advice there is when talking about the code style is be consistent with the rest of the code in the file.
The primary source for the style guide is the .eslintrc; but for quick reference here are some of the main code style rules:
- file references to browser globals such as
windowanddocumentneed/* eslint-env browser */at the top of the file, - lines should be 90 characters maximum,
- indent with 2 spaces (no tabs!),
-
camelCasePlease, - don't open braces on the next line,
- don't name function expressions:
let o = { doSomething: function doSomething() {} };, - use a space before opening paren for anonymous functions, but don't use one for named functions:
- anonymous functions:
function () {} - named functions:
function foo() {} - anonymous generators:
function* () {} - named generators:
function* foo() {}
- anonymous functions:
- aim for short functions, 24 lines max (ESLint has a rule that checks for function complexity too),
- aArguments aAre the aDevil (don't use them please),
-
"use strict";globally per module, -
semicolons; // use them, - no comma-first,
- consider using Task.jsm (
Task.async,Task.spawn) for nice-looking asynchronous code instead of formatting endless.thenchains, - use ES6 syntax:
-
function setBreakpoint({url, line, column}) { ... }, -
(...args) => { }rest args are awesome, no need forarguments, -
for..ofloops,
-
- don't use non-standard SpiderMonkey-only syntax:
- no
for eachloops, - no
function () implicitReturnVal, - getters / setters require { },
- no
- only import specific, explicitly-declared symbols into your namespace:
-
const { foo, bar } = require("foo/bar");, -
const { foo, bar } = Cu.import("…", {});,
-
- use Maps, Sets, WeakMaps when possible,
- use
`template strings`whenever possible to avoid concatenation, allow multi-line strings, and interpolation
Comments
Commenting code is important, but bad comments can hurt too, so it's important to have a few rules in mind when commenting:
- If the code can be rewritten to be made more readable, then that should be preferred over writing an explanation as a comment.
- Instead of writing a comment to explain the meaning of a poorly chosen variable name, then rename that variable.
- Avoid long separator comments like
// ****************** another section below **********. They are often a sign that you should split a file in multiple files. - Line comments go above the code they are commenting, not at the end of the line.
- Sentences in comments start with a capital letter and end with a period.
- Watch out for typos.
- Obsolete copy/pasted code hurts, make sure you update comments inside copy/pasted code blocks.
- A global comment at the very top of a file explaining what the file is about and the major types/classes/functions it contains is a good idea for quickly browsing code.
- If you are forced to employ some kind of hack in your code, and there's no way around it, then add a comment that explains the hack and why it is needed. The reviewer is going to ask for one anyway.
- Bullet points in comments should use stars aligned with the first comment to format each point
// headline comment
// * bullet point 1
// * bullet point 2
Asynchronous Code
A lot of code in DevTools is asynchronous, because a lot of it relies on connecting to the DevTools debugger server and getting information from there in an asynchronous fashion.
It's easy to make mistakes with asynchronous code, so here are a few guidelines that should help:
- Prefer promises over callbacks.
- Use the
new Promise(() => {})syntax. - Don't forget to catch rejections by defining a rejection handler:
promise.then(() => console.log("resolved"), () => console.log("rejected"));orpromise.catch(() => console.log("rejected"));. - Make use of
Tasksand generator functions to make asynchronous code look synchronous.
React & Redux
Basic code style
You can find React-specific code style rules in the .eslintrc file.
Components
- Default to creating components as stateless function components.
- If you need local state or lifecycle methods, use
React.createClassinstead of functions. - Use React.DOM to create native elements. Assign it to a variable named
dom, and use it likedom.div({}, dom.span({})). You may also destructure specific elements directly:const { div, ul } = React.DOM.
PropTypes
- Use PropTypes to define the expected properties of your component. Each directly accessed property (or child of a property) should have a corresponding PropType.
- Use
isRequiredfor any required properties. - Place the propTypes definition at the top of the component. If using a stateless function component, place it above the declaration of the function.
- Where the children property is used, consider validating the children.


