Security/Fennec-TLS-MITM
Contents
- 1 Fennec TLS/SSL Man In The Middle
- 2 Setting up your network
- 3 Routing all traffic through your local development machine
- 4 Using ZAP
- 5 Test here if you can intercept TLS without adding certificates to the device
- 6 Adding certificates to the device
Fennec TLS/SSL Man In The Middle
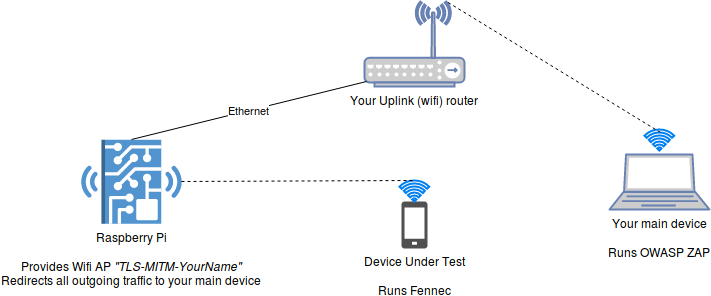
Setting up your network
What you need
- Raspberry Pi
- If you have a spare raspberry pi, use it!
- Raspberry Pi 3 comes with Wifi onboard
- Freddy used an RPi2 with this wifi usb dongle
- Install Raspbian. That’s easiest. But other Linuxes will do.
- Ethernet(!) connectivity between your Raspberry Pi and your main device (highly recommended to plug it into your router)
- Wifi capabilities
Linux Software Setup on your Raspberry Pi
Setting up an Access Point
Install required software
sudo apt install hostapd dnsmasq
Setup /etc/hostapd/hostapd.conf, e.g.
interface=wlan0
# recommended to add your name in a shared office
ssid=TLS-MITM-AP-YourName
channel=1
macaddr_acl=0 # no mac whitelist
auth_algs=1
ignore_broadcast_ssid=0 # will broadcast ssid
wpa=2
wpa_passphrase=changeme
wpa_key_mgmt=WPA-PSK
wpa_pairwise=TKIP
rsn_pairwise=CCMP
# driver optional, it turns out.
#driver=rtl871xdrv
ieee80211n=1
hw_mode=g
Setting up /etc/dnsmasq.conf
Feel free to change the IP address, depending on your network
dhcp-range=192.168.3.50,192.168.3.150,12h
Setting up iptables
These two shell scripts come in handy. You can set them to executable with chmod +x <file>
$ cat intercept-enable.sh
#!/bin/sh
DESTINATION=10.249.29.77
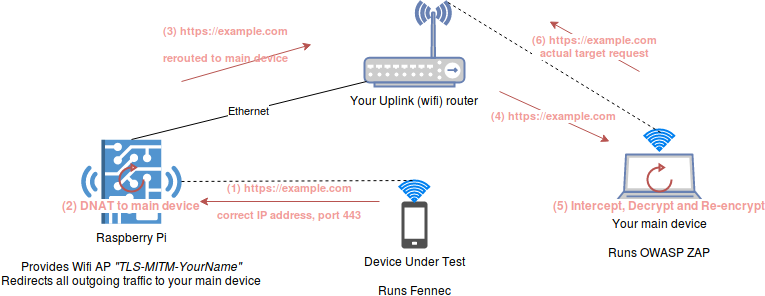
iptables -t nat -A PREROUTING -p tcp --dport 443 -j DNAT --to-destination $DESTINATION:8443
iptables -t nat -A PREROUTING -p tcp --dport 80 -j DNAT --to-destination $DESTINATION:8080
$ cat intercept-disable.sh
#!/bin/sh
iptables -t nat -F PREROUTING
Enable/Disabling the routing via ./intercept-disable.sh and ./intercept-enable.sh
Routing all traffic through your local development machine
Using ZAP
OWASP ZAP comes with its own documentation and installation instructions. Follow these first.
After ZAP is properly setup, you should find your CA certificate in the Preferences save it to file for later use. We’ll need this on the phone later!
Go to ZAP Extensions, select Marketplace
 Install the “SNI Terminator” extension.
Normally, ZAP will expect clients to use it as an HTTP proxy (using the CONNECT request method). This add-on allows raw requests to be captured and rerouted. It will also accept TLS handshakes over port 8443 and issue matching certificates using Server Name Indications.
Test here if you can intercept TLS without adding certificates to the device
At this point all unencrypted traffic should be able to flow from the device under test, to the rogue access point, through ZAP and into the public internet. Test that your setup is sound by navigating your device to e.g., http://example.com (unencrypted). Next, test https://example.com (note HTTPS). You should see warnings about an unknown certificate issuer
Adding certificates to the device
Android System
You will need this as Firefox bits that are implemented in Java use the android certificate store. This is especially relevant for Firefox Focus. Next up, we want to add the OWASP ZAP root CA certificate to your device under test. Android allows this under settings, but only if you set a pin code (or unlock pattern). Do this first and then find the certificate settings (possibly in advanced wifi settings, depends on version) After this, you should see the first HTTPS requests going through ZAP. Some parts of the system, as well as Firefox bits that are implemented in Java use the android certificate store.
Firefox for Android
While this may be the case, Firefox uses its own certificate store and is still going to be annoyed about unknown issuers. Unfortunately, Firefox for Android does not come with a certificate settings UI. I’ve gone the route to debug Firefox for Android using the DevTools. To Debug Firefox for Android you need to set up a separate Firefox profile on Desktop, I’d like to call mine “chrome-debugger”. In this separate browser open Developer Tools, find the cog icon for Settings and scroll for Advanced Settings (bottom right). Enable this checkbox:
- Enable remote debugging
You will want to debug via USB and not Wifi. This is the easiest way for your network intercepting setup to remain intact. Full instructions are at available on MDN. Once you have WebIDE attached to your phone, you can debug the Main Process and execute chrome privileged JavaScript. To add a certificate via chrome JavaScript, you may use this script, but remember to replace the big block of text with your own certificate! You may have to restart Firefox for the changes to take effect.
Done!
freddy@x270:~$ lowriter /tmp/Fennec\ TLS_SSL\ Man-In-The-Middle.docx ^C freddy@x270:~$ man pandoc freddy@x270:~$ pandoc -t mediawiki /tmp/Fennec\ TLS_SSL\ Man-In-The-Middle.docx
Setting up your network
What you need
Raspberry Pi
If you have a spare raspberry pi, use it!
Raspberry Pi 3 comes with Wifi onboard
Freddy used an RPi2 with this wifi usb dongle.
Install Raspbian. That’s easiest. But other Linuxes will do.
Ethernet(!) connectivity between your Raspberry Pi and your main device (highly recommended to plug it into your router)
Wifi capabilities
Linux Software Setup on your Raspberry Pi
Setting up an Access Point
Install required software
sudo apt install hostapd dnsmasq
Setup /etc/hostapd/hostapd.conf, e.g.
interface=wlan0
- recommended to add your name in a shared office
ssid=TLS-MITM-AP-YourName
channel=1
macaddr_acl=0 # no mac whitelist
auth_algs=1
ignore_broadcast_ssid=0 # will broadcast ssid
wpa=2
wpa_passphrase=changeme
wpa_key_mgmt=WPA-PSK
wpa_pairwise=TKIP
rsn_pairwise=CCMP
- driver optional, it turns out.
- driver=rtl871xdrv
ieee80211n=1
hw_mode=g
Setting up /etc/dnsmasq.conf
Feel free to change the IP address, depending on your network
dhcp-range=192.168.3.50,192.168.3.150,12h
Setting up iptables
These two shell scripts come in handy. You can set them to executable with chmod +x <file>
$ cat intercept-enable.sh
- !/bin/sh
DESTINATION=10.249.29.77
iptables -t nat -A PREROUTING -p tcp --dport 443 -j DNAT --to-destination $DESTINATION:8443
iptables -t nat -A PREROUTING -p tcp --dport 80 -j DNAT --to-destination $DESTINATION:8080
$ cat intercept-disable.sh
- !/bin/sh
iptables -t nat -F PREROUTING
Enable/Disabling the routing via ./intercept-disable.sh and ./intercept-enable.sh
Routing all traffic through your local development machine
Using ZAP
OWASP ZAP comes with its own documentation and installation instructions. Follow these first.
After ZAP is properly setup, you should find your CA certificate in the Preferences save it to file for later use. We’ll need this on the phone later!
Go to ZAP Extensions, select Marketplace
Install the “SNI Terminator” extension.
Normally, ZAP will expect clients to use it as an HTTP proxy (using the CONNECT request method). This add-on allows raw requests to be captured and rerouted. It will also accept TLS handshakes over port 8443 and issue matching certificates using Server Name Indications.
Test here if you can intercept TLS without adding certificates to the device
At this point all unencrypted traffic should be able to flow from the device under test, to the rogue access point, through ZAP and into the public internet. Test that your setup is sound by navigating your device to e.g., http://example.com (unencrypted).
Next, test https://example.com (note HTTPS). You should see warnings about an unknown certificate issuer
Adding certificates to the device
Android System
You will need this as Firefox bits that are implemented in Java use the android certificate store. This is especially relevant for Firefox Focus. Next up, we want to add the OWASP ZAP root CA certificate to your device under test. Android allows this under settings, but only if you set a pin code (or unlock pattern). Do this first and then find the certificate settings (possibly in advanced wifi settings, depends on version) After this, you should see the first HTTPS requests going through ZAP. Some parts of the system, as well as Firefox bits that are implemented in Java use the android certificate store.
Firefox for Android
While this may be the case, Firefox uses its own certificate store and is still going to be annoyed about unknown issuers. Unfortunately, Firefox for Android does not come with a certificate settings UI. I’ve gone the route to debug Firefox for Android using the DevTools. To Debug Firefox for Android you need to set up a separate Firefox profile on Desktop, I’d like to call mine “chrome-debugger”. In this separate browser open Developer Tools, find the cog icon for Settings and scroll for Advanced Settings (bottom right). Enable this checkbox:
Enable remote debugging
You will want to debug via USB and not Wifi. This is the easiest way for your network intercepting setup to remain intact. Full instructions are at available on MDN. Once you have WebIDE attached to your phone, you can debug the Main Process and execute chrome privileged JavaScript. To add a certificate via chrome JavaScript, you may use this script, but remember to replace the big block of text with your own certificate! You may have to restart Firefox for the changes to take effect.
Done!

